Opus is moving to a new format for our reports (data tables). We will slowly move tables from the old to new format. The new format is outlined below and in the related articles.
As of April 2026, the only table using the new format is the Academic Apprentice Personnel report, which is currently only available to AAPO.
To simplify working with a large number of records in its data tables, Opus provides options to reorder records within a table (sorting), and to control which records display (filtering). Both of these options can be applied in a range of ways, either independently or at the same time. This article focuses on sorting.
Reordering Table Records
Sorting options allow users to reorder the display of records within a data table.
How It Works
Sorting Options are controlled by clicking the Sort Arrow, located at the top of each column in a data table. Clicking the arrow cycles through ascending sort, descending sort, and no sort.
Ascending ("blue arrow pointing up" icon)

The records in the table are sorted in ascending order by the selected column, numerically increasing and from A to Z. Dates are sorted oldest to newest.
- Descending ("blue arrow pointing down" icon)

- The records in the table are sorted in descending order by this column, numerically decreasing and from Z to A. Dates are sorted newest to oldest.
- No sort ("up/down grey arrows" icon)

- The table is not sorted by this column.
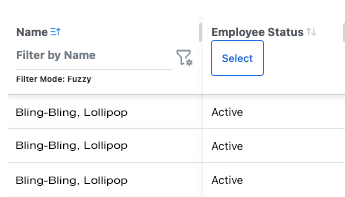
Example
The following screenshot shows a table with the sort icon highlighted for the Name column. The records in the screenshot are sorted in ascending order from A to Z, on the Name column, and the arrow in the icon is an "up pointing" arrow. Clicking the icon again would sort descending, changing the arrow to a "down pointing" arrow and reversing the order of the records in the table (Z to A). Clicking it a third time would change the icon to neutral arrows (no sort) as seen in the Employee Status column.
Multi-Column Sorting
Users may want to use Sorting Options in multiple columns simultaneously. This can be done by holding the Shift key down while sorting additional columns.
NOTE: In a future release, users will be able to see which columns the table is sorted by displayed above the table.
Sorting Options in More Than 2 Columns
Sorting Options can be applied in as many columns as the user desires. Their application always follows the same rules outlined above.
NOTE: Inadvertently using Sorting Options in multiple columns may result in an unexpected order of records. If you activate too many Sorting Options, consider pressing "Reset Table" to clear them quickly.
Combining Sorting with Filtering
When a data table is filtered, Sorting Options act on the records still visible in the table i.e., sorting and filtering occur simultaneously. See the articles linked below for more information about filtering data tables.
Returning To Default Settings
Sorting Options can be reset to their default state by using the Reset Table button. Clicking the "Reset Table" button will also clear applied filters and restore visible columns to their default states:

See Also
Data Tables: Filtering Data Within A Table